
Ever since their debut in 2016, more than 100 million AirPods have sold worldwide, making them one of Apple’s most cherished accessories.
As a proud owner and heavy user of nearly every AirPod model out there, I use mine for everything from work meetings and events to personal leisure activities like jamming to my favorite tunes. Forgetting to pack anything else while traveling is a possibility, but forgetting my AirPods? Never!
Over the years of usage and troubleshooting AirPod issues, I’ve found that sound issues aren’t uncommon. Generally, they work like a dream, but occasionally, things might go haywire.
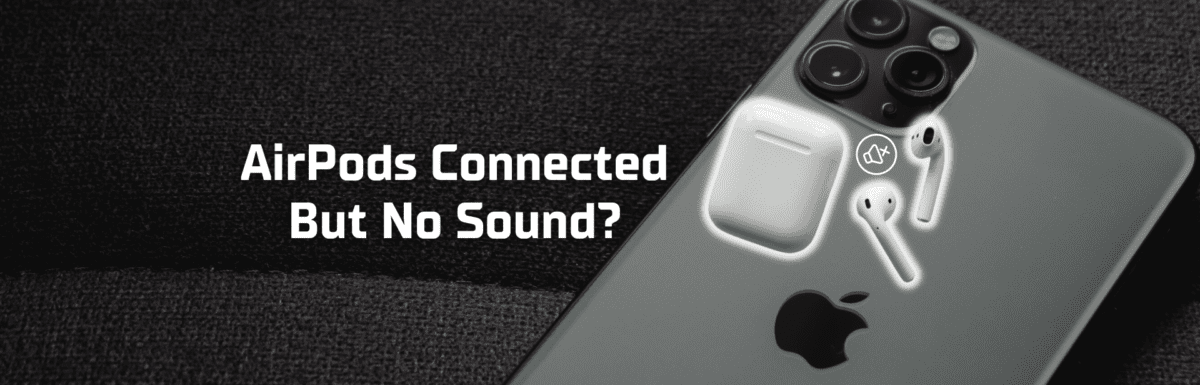
One problem that crops up quite often is the AirPods being connected but producing no sound.
If you’re currently facing this issue, there’s no need to panic. It’s a minor hiccup, and I’m here to help you navigate through it.
In this guide, I’ll detail why your AirPods may be connected but silent, and steps you can take to rectify this issue.
The Clever Fix
If your AirPods are connected but you can’t hear anything, try to disconnect and reconnect your Bluetooth. You can do this by going to the Settings app, selecting Bluetooth, turning off the switch, waiting for 30 seconds, then turning it back on.
Why are my AirPods connected but have no sound?
There could be several reasons for this, like Bluetooth connection glitches, a buildup of dirt or ear wax in the speaker mesh, or a low battery. These are some of the most common reasons why your AirPods might be connected but silent.
However, other factors could come into play, such as multiple connections, network issues, outdated software, and more.
What should I do if my AirPods are connected but have no sound?
If your AirPods are connected, but there is no sound, turn off and reconnect your Bluetooth. Go to the Settings app, then tap Bluetooth. Switch the toggle off and wait for 30 seconds. Then switch it back on.

If you’re still not hearing anything, no need to stress.
Give connecting your AirPods to a different device a shot. If you get sound when paired with a different device, there could be some issue with your original device.
You might want to test different music apps as well. If you’re using Apple Music and it’s silent, then Spotify or YouTube might do the trick.
And if you’re still stuck with the silent treatment, don’t sweat it. Coming right up, I’m going to guide you through some of the usual culprits for this issue and the easy, tested solutions you can try straight away.
How do I bring back the sound on my AirPods? Issues and quick fixes
Issue 1: Dirty AirPods
Are you in the habit of cleaning your AirPods regularly? And when you do, are you including the speaker meshes?
Given their design and how they fit snugly in your ears, it’s no surprise that your AirPods can collect ear wax and sweat. Over time, this muck and the inevitable dust particles can stick firmly to them.
When this happens, you might notice a significant dip in sound quality. Your AirPods audio might become weak or muffled, or sometimes, you might not hear anything at all.
Fix 1: Clean your AirPods
Take a moment to inspect the speaker meshes of your AirPods. If you find that grime and gunk are building up there, it’s high time for a clean-up.

In cleaning your AirPods, you can use the following:
- Q-tips cotton swab
- Dry and lint-free cloth
- A clean and dry toothbrush
- A toothpick
You can use any of the above-mentioned tools to gently scrape off the gunk collected in your AirPods’ speaker mesh. A gentle blow may also help remove any lingering debris.
But remember, don’t ever rinse your AirPods under water or clean them using alcohol or any other liquid, particularly when tending to the speaker mesh.
However, if you’re an AirPods Pro user, you can remove and rinse the ear tips, just make sure they’re thoroughly dry before reattaching them.
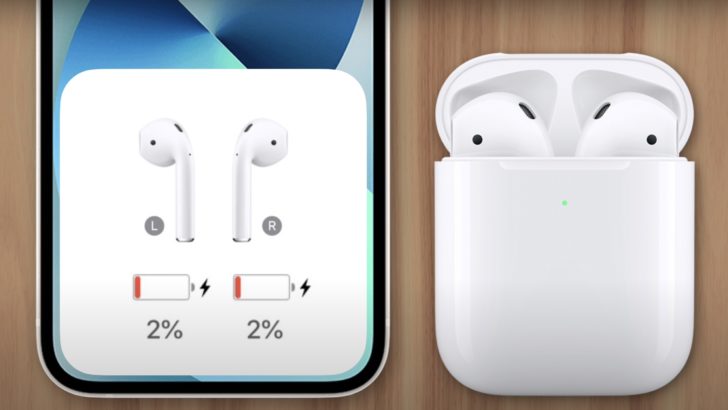
Issue 2: Low Battery
Surprisingly enough, the battery level of your AirPods could be influencing the sound quality.
I ran a little experiment a few months back. I compared my AirPods sound when they were nearly fully charged and when they were down to just 10%. The difference was stark.
So, for optimal performance, it’s best to keep your AirPods well-charged.
Fix 2: Charge your AirPods
Remove your AirPods and give them a good charge. Ensure they’re properly set in the case while charging.
If you’re using the 3rd Generation AirPods, a quick 5-minute charge can give you an hour of listening time. But if you’re not getting any sound, it might be worth charging them fully before giving them another go.
Issue 3: Multiple Accessories or Devices
Do you connect other Bluetooth speakers to your iPhone along with your AirPods? Or perhaps your AirPods are connected to multiple devices?
Switching between different accessories could potentially mess with your AirPods’ connection. There might be instances where your AirPods might connect to a different device automatically.
I’ve had this happen to me. I was rushing, put on my AirPods, started a podcast on my iPhone, but heard no sound!
Apparently, my AirPods were connected to my iPad.
Fix 3: Disconnect other accessories and devices
You may remove the connection noise (and possibly bring the sound back!) by disconnecting other accessories and devices.
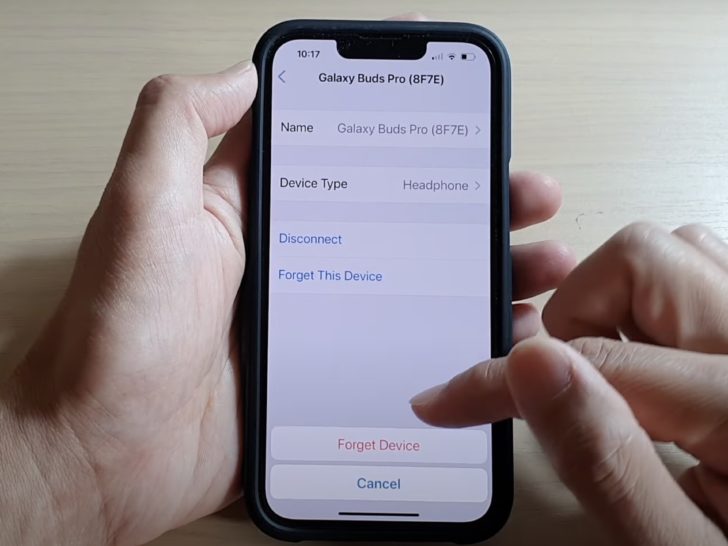
Remove all the external Bluetooth accessories on your device using these steps:
- Go to Settings.
- Then Bluetooth.
- On My Devices, tap the “i” icon beside your other devices.
- Tap Forget This Device.
- Tap Forget Device to confirm.
You may also want to try turning off the automatic switching option of your AirPods. If you’re using an iPhone or iPad:
- While your AirPods are in your ear and connected, open the Settings app.
- Then go to Bluetooth.
- Tap the “i” symbol beside the name of your AirPods.
- Tap Connect to this iPhone (or iPad).
- Then select When Last Connected to This iPhone (or iPad).
I also suggest turning off Bluetooth on your other devices.
Issue 4: Reduce Loud Sounds feature
Constant exposure to loud volume and noise may result in hearing loss.
An Apple Hearing Study research found that one in ten participants were exposed to headphone levels exceeding the World Health Organization’s recommended limit.
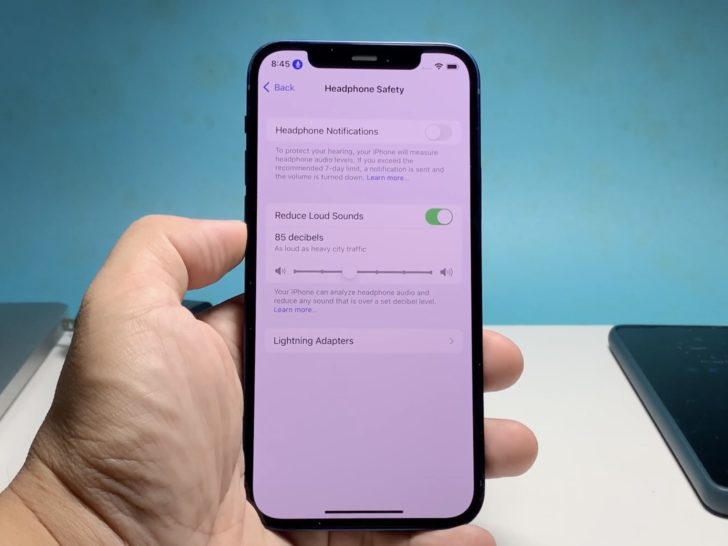
According to the WHO, 85 decibels is the highest safe exposure level up to 8 hours.
That said, Apple introduced the ‘Reduce Loud Sounds’ feature in iOS 15. It’s a fantastic safety feature but can sometimes reduce the volume to such a level that it might seem like your AirPods are silent.
Fix 4: Turn off the Reduce Loud Sounds feature
While it’s generally recommended to keep the ‘Reduce Loud Sounds’ feature enabled to prevent potential hearing damage, it could be the culprit behind your AirPods’ sound issue.
To test this, you might want to temporarily disable it by following these steps:
- Go to Settings.
- Tap Sound & Haptics.
- Select Headphone Safety.
- Turn off Reduce Loud Sounds.
Alternatively, you could keep the feature enabled but adjust the maximum decibel level to a higher setting.
Issue 5: Mono and Audio Balance Feature
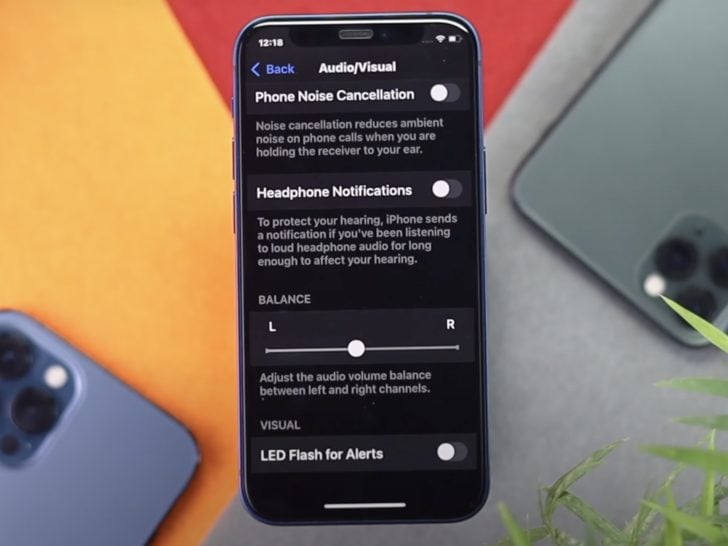
Apple offers Audio/Visual Accessibility options to ensure optimized sound delivery.
The Mono Audio feature, for instance, ensures identical audio content to both AirPods. But when it’s off, the default is Stereo Audio.
In Stereo Audio, the left and right AirPods are distinct channels. That means you may hear the bass on your left AirPod, while you hear the rest on your right AirPod..
Additionally, the Balance feature is another Audio/Visual Accessibility feature. It lets you adjust the audio volume between the left and right AirPods.
If skewed too far in one direction, you might not hear anything in one of your AirPods.
Fix 5: Use Mono and adjust the Audio Balance
If you’re on the default Stereo Audio, you might want to switch to Mono Audio:
- Open the Settings app.
- Go to Accessibility.
- Tap Audio/Visual.
- Turn the Mono Audio toggle on.
Also, ensure the Balance slider under the ‘Audio/Visual’ settings is centered (0.00).
Issue 6: Automatic Ear Detection Feature
To be honest, Automatic Ear Detection is one of my favorite features.
It can pause or stop audio when you remove one or both AirPods. However, it can sometimes mistakenly think that the AirPods have been removed and pause or stop the sound.
However, sometimes, this feature can confuse your device. The sound may pause or stop playing even if you haven’t removed your AirPods. Your device thinks your AirPods aren’t on your ears.
Fix 6: Turn off the Automatic Ear Detection Feature
To turn off the Automatic Ear Detection feature, wear your AirPods. And then connect them to your device.
On your iPhone or iPad:
- Go to Settings.
- Choose Bluetooth.
- Tap the “i” icon next to your AirPods’ name.
- Turn the Automatic Ear Detection off.
But if you’re using Mac:
- Click the Apple menu logo.
- Select System Preferences.
- Choose Bluetooth.
- Click Options.
- Turn the Automatic Ear Detection off.
Issue 7: Network Settings Problem
Sometimes, a network issue might interfere with your Bluetooth’s performance, leading to your AirPods being connected but silent.
This can often occur due to a buildup of network connections over time, which may mess up your device’s system after a while.
Fix 7: Reset your Network Settings
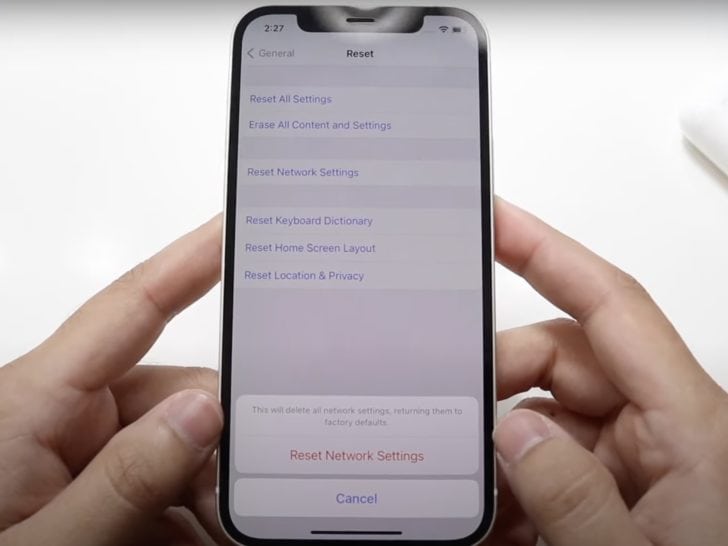
Reset your Network Settings to resolve any network or Bluetooth issue.
Resetting your network settings can help resolve any network or Bluetooth issue. Be aware, though, this will erase all your saved Wi-Fi and Bluetooth connections, as well as reset your cellular and VPN settings.
If you have iOS or iPadOS 15:
- Open the Settings.
- Go to General.
- Tap Transfer or Reset iPhone (or iPad).
- Tap Reset.
- Select Reset Network Settings.
If you have iOS or iPadOS 14 or earlier:
- Go to Settings.
- Tap General.
- Select Reset.
- Tap Reset Network Settings.
Issue 8: AirPods Bugs
AirPods can run into bugs from time to time.
These bugs can result in glitches like stuttering, disconnection, or audio errors.
Fortunately, these bugs and glitches can easily be fixed.
Fix 8: Reset and reconnect your AirPods
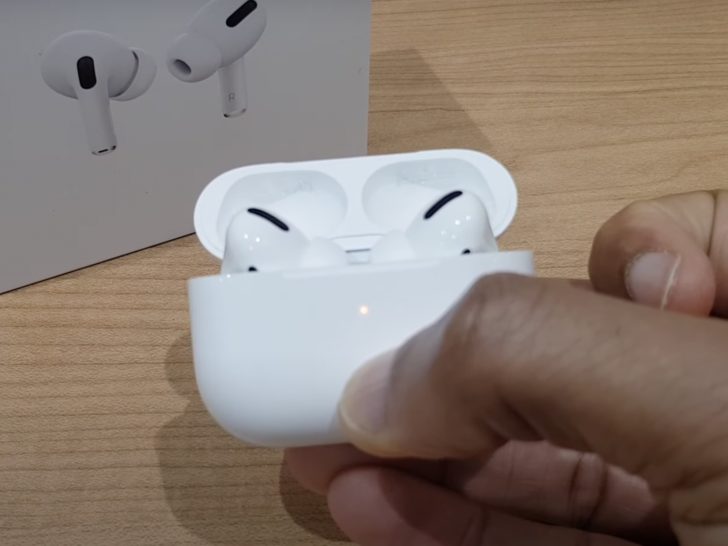
Resetting your AirPods can often get rid of those pesky glitches and bugs.
Here’s how to reset your AirPods:
- Put them back in their case and shut the lid.
- Wait about 30 seconds, then reopen the lid.
- On your iPhone or iPad, go to Settings.
- Go to Bluetooth.
- Tap the “i” symbol beside the name of your AirPods.
- Choose Forget this Device, and confirm your choice.
- While the lid is open, press and hold the setup button at the back of the case for 15 seconds.
- Wait for the light to change from amber to white.
Once the light turns white, your AirPods have been reset. It will then automatically go into reconnecting mode.
To reconnect them to your device:
- Keep the case lid open and place your device close to the case.
- Tap Connect when the notification pops up on your device’s screen.
Issue 9: Outdated software or firmware

Sometimes, the newest iOS or iPadOS updates can come with their own set of bugs.
For this reason, some folks prefer to wait a little while before jumping onto the latest update. Rushing into an update could lead to a few hiccups, but forgetting to update can cause its own problems too.
In addition to iOS updates, Apple also rolls out firmware updates for the AirPods. However, unlike iOS updates, you don’t have the option to manually update the firmware.
So, if your AirPods didn’t automatically receive the latest firmware, that could be the reason you’re having audio problems.
Fix 9: Update your software and firmware
First up, it’s smart to back up your device using iCloud before you start messing with updates.
To update your iPhone or iPad:
- Plug your device and connect via Wi-Fi.
- Go to Settings, then tap General.
- Select Software Update.
- Tap Download and Install.
Updating the firmware on your AirPods can be a bit more complicated compared to updating iOS.
Apple doesn’t provide specific steps to update your AirPods’ firmware, but I’ve got a method that works pretty well.
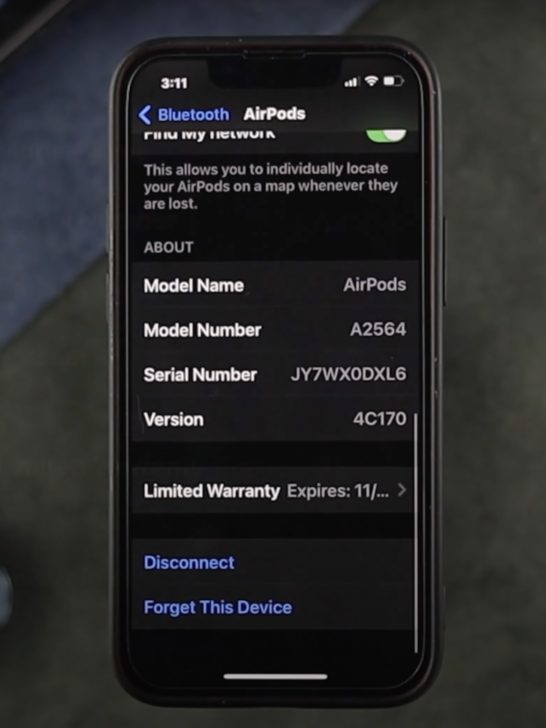
First, you should check your AirPods’ current firmware version:
- Connect your AirPods to your device and place them in the case.
- On your iPhone or iPad, go to Settings > Bluetooth.
- Tap the “i” icon next to your AirPods’ name.
- Scroll down to Version to see your AirPods’ firmware.
- Check Apple’s support page to see the latest firmware version for your AirPods.
If your AirPods’ firmware is out of date, follow these steps to update it:
- Place your AirPods inside the case.
- Close the lid of your case for 30 seconds.
- Take the AirPods out and place them in your ears.
- Wait for about 15 seconds.
- Remove your AirPods, put them in the case, and close the lid.
- Charge your AirPods case.
- Place your iPhone or iPad beside the case for about 10-15 minutes.
- Open the lid of your AirPods case after 10-15 minutes.
- Check the firmware version on your iPhone or iPad.
Issue 10: Internal damage
AirPods can suffer internal damage over time, especially if they’ve been dropped several times.
You might not notice any external damage, but the internal components might be suffering with loose wires or broken parts.
Fix 10: Buy new AirPods

From my years of experience, I can say AirPods are usually pretty tough to repair.
You can certainly contact Apple Support and ask for a repair, but I don’t want to get your hopes up if it turns out to be hardware damage.
Sadly, the standard AppleCare warranty doesn’t cover accidental damage. However, if you’ve got AppleCare+ for your AirPods, it provides coverage for two incidents of accidental damage per year.
If your AirPods can’t be repaired, you might have to consider buying a new pair.
Conclusion
If your AirPods are connected but there’s no sound, stay calm. It’s likely a common problem that you can fix with the right steps.
Turning your Bluetooth off and then on again after 30 seconds solves the problem about 90% of the time.
If it doesn’t work, you can also try the following fixes:
- Clean your AirPods.
- Charge your AirPods.
- Disconnect other accessories or devices.
- Turn off Reduce Loud Sounds.
- Use Mono Audio and adjust the Audio Balance.
- Turn off the Automatic Ear Detection feature.
- Reset your Network Settings.
- Reset and reconnect your AirPods.
- Update your device’s software and your AirPods’ firmware.
In the end, if all else fails and it seems like a hardware issue, you might need to buy new AirPods. But fingers crossed that one of the above fixes resolves the issue for you!