Tired of hitting pause, rewind, and play only to find your Roku audio still out of sync?
Nothing derails a cozy movie night like audio that lags behind or races ahead of the scene. And let’s face it, watching your favorite TV show without sound isn’t really an option.
Fear not — the fix is quite literally at your fingertips because all you need is your remote to rectify your out-of-sync audio.
If the old pause-rewind-play trick didn’t do the job, let me walk you through some straightforward solutions to get your audio back in harmony.
The Clever Fix
Power cycle the TV by unplugging it from the power socket for a couple of minutes. After that, plug it back in and switch it on.
If rebooting your device didn’t solve the problem, and if this issue seems to crop up often, consider the remedies outlined below.
Why is my Roku audio out of sync?
There are various factors that can throw your audio out of sync, like glitches with your internet connection, issues with the streaming service, outdated software, peculiar audio settings, or a faulty device.
Given that you’ve landed on this page, your internet seems to be working.
However, it’s always wise to double-check your Roku’s connection, particularly if you’re dealing with an audio lag coupled with streaming delays.
A rating of Excellent or Good indicates that your internet connection is solid and your Wi-Fi probably isn’t the problem. If that’s the case, you can dive straight into the solutions.
If it says Fair or Poor, you might experience streaming lags which could result in out-of-sync audio. In this case, reboot your router to resolve any Wi-Fi hiccups.
To do this, switch off your Wi-Fi router, unplug it for about a minute, then plug it back in.
Open the streaming channel again and play any video to see if this clears up the issue.
How to fix my Roku audio out of sync
For your convenience, we’ll start with the simplest solution and progressively move on to more intricate ones.
Thanks to my experience in troubleshooting various tech glitches, I’ve put together this list of tried-and-true solutions to make fixing your Roku out-of-sync audio a breeze.
Give these solutions a shot one at a time, in the order they’re listed, and find out what works best for you.
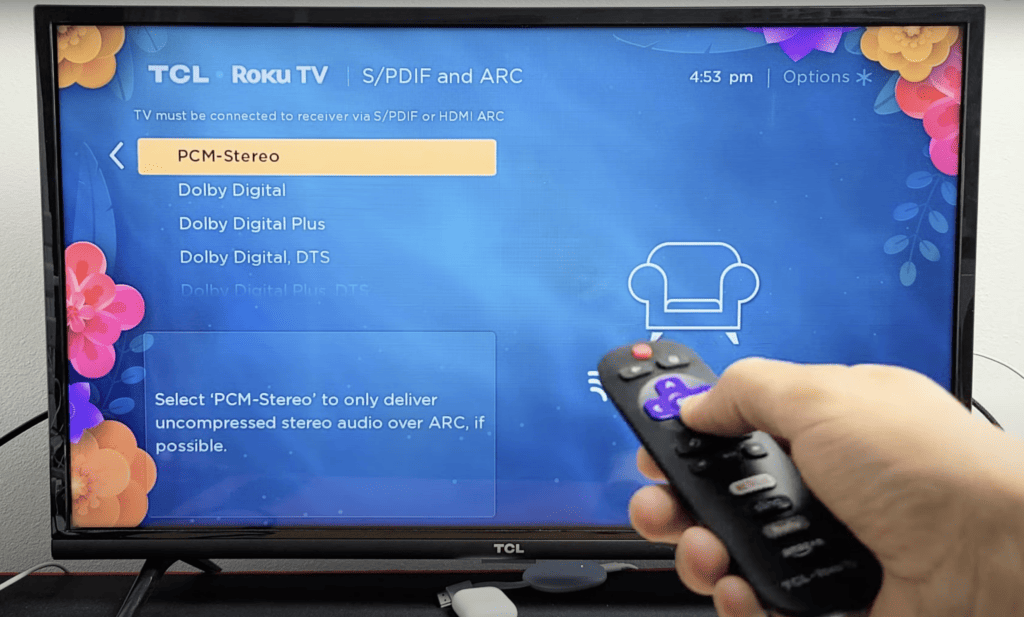
1. Change audio setting to “Stereo”

Sometimes, audio troubles can arise due to a mismatch between different audio output formats like Stereo, Dolby Digital, Dolby Digital Plus, and DTS, your speakers’ capabilities, and the video source or streaming channel.
A quick adjustment of the audio settings often immediately corrects the out-of-sync audio, and that’s what we’re going to try first.
To apply this fix, hit the Home button on your remote to launch the home screen and then follow these steps:
- On the home screen, select Settings.
- Open Audio.
- Switch Audio Mode to Stereo.
- Under the same setting, set HDMI Mode to PCM Stereo.
Give streaming a try to test if the audio issue is resolved. If not, let’s proceed to the next solutions.
2. Turn off the volume and audio leveling
On occasion, the problem stems from the volume and audio settings.
Roku contains settings that help maintain a stable volume level across all forms of media, so you don’t have to scramble to turn down the volume when the media suddenly blasts, like during a commercial break or when you switch channels.
While these settings usually work just fine, they can sometimes be the culprit behind audio delays.
While applying this fix, feel free to play a video so you can instantly verify if it’s effective. To disable the volume and audio leveling, follow the steps below.

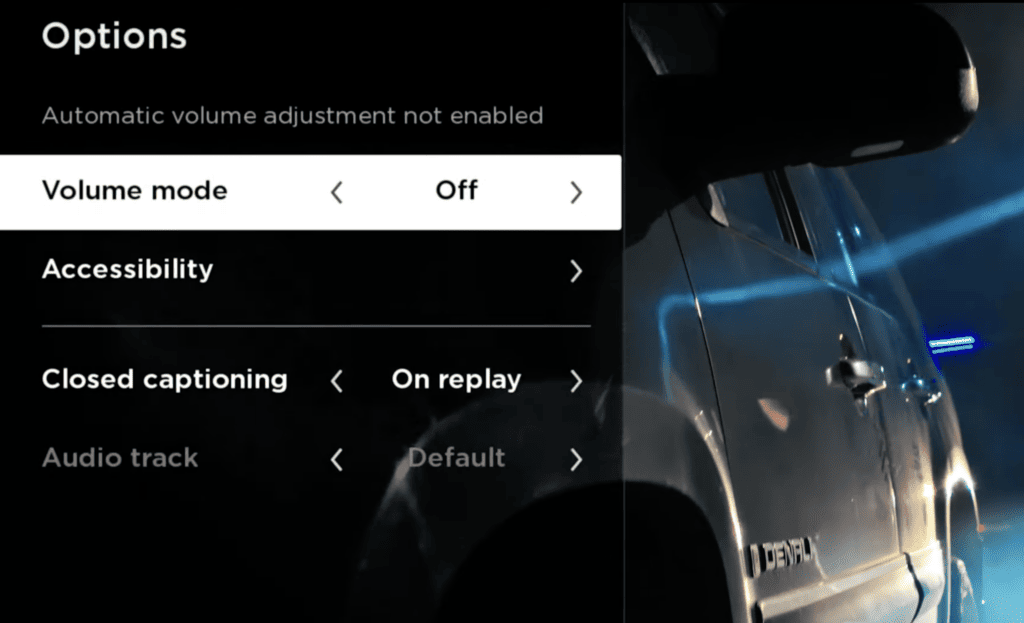
Turn off the volume mode:
- Press the asterisk (*) button on the Roku remote.
- Select Volume Mode.
- Turn off Volume Mode.
Turn off the audio leveling:
- Press the asterisk (*) button on the Roku remote.
- Select Audio Leveling.
- Turn off Audio Leveling.
See if this solution resolves the issue. If not, continue scrolling to see other solutions.
3. Restart your Roku device
Rebooting gives your device a fresh start without erasing your current settings or installed channels.
Often, we resort to unplugging to reset a device, but Roku provides an option to restart the system without having to disconnect it from the power source.
If you’d rather not unplug, you can use your remote for a system reboot.
All you need to do is to press the Home button on your remote to launch the home screen, then follow this sequence:
Settings > Systems > Power (if present, skip if not) > System Restart > Restart
(Note: The Power option varies by device. Some Roku devices don’t show this option and lead you directly to System Restart.)

Or, you can reboot your Roku using a simple sequence of button presses on your remote.
Start from your home screen and follow this order:
- Press the Home button 5 times.
- Press the UP button on the navigation pad 1 time.
- Press the Rewind button 2 times.
- Press the Fast Forward button 2 times.
These methods should hopefully get your audio back in sync. If not, we’ll proceed to review/fix the Roku system itself.
4. Check for software update
See if your Roku software is up-to-date.
While software updates are typically automatic, sometimes glitches occur and you might need to manually check and update your Roku OS.
Head to your home screen by pressing the Home button on your remote, then follow this path:
Settings > System > System Update > Check Now > Update Now (if available)
If there’s an Update Now option, go ahead and wait until the update is complete. Then, open the channel and play a video to see if the audio is back on track.
On the other hand, if there’s no Update Now option, your Roku software is already up-to-date. So, this may not be causing your audio to be out of sync.
Make sure you’ve tried all the solutions mentioned so far because the ones that follow involve reinstalling channels, resetting the audio, and even factory resetting the Roku device.
5. Check other channels
Sometimes, the audio hiccup could be specific to a particular channel.
Open other channels (like Netflix, Hulu, etc.) on your Roku to see if the problem spans across the whole device or is just isolated to one channel.
If other channels work fine and only one is giving you audio trouble, then it’s likely there’s an issue with that specific channel.
If the audio is out of sync on all streaming sites, you can skip this step and continue exploring other solutions from this list.
The trick to sorting out a channel-specific audio issue is to uninstall and reinstall the channel. Here’s how you do it:
Removing a channel
- Press the Home button on the remote.
- Scroll through the channels and highlight the target channel.
- Press the Asterisk (*) in the remote.
- Select Remove Channel and confirm your choice.
- Restart the TV by powering it off and on.
Installing a channel
- Navigate the home screen and go to Streaming Channels to open the channel store.
- Browse through the list, or go to Search Channels to type in the channel title.
- Select the target channel, click Add Channel, then OK.
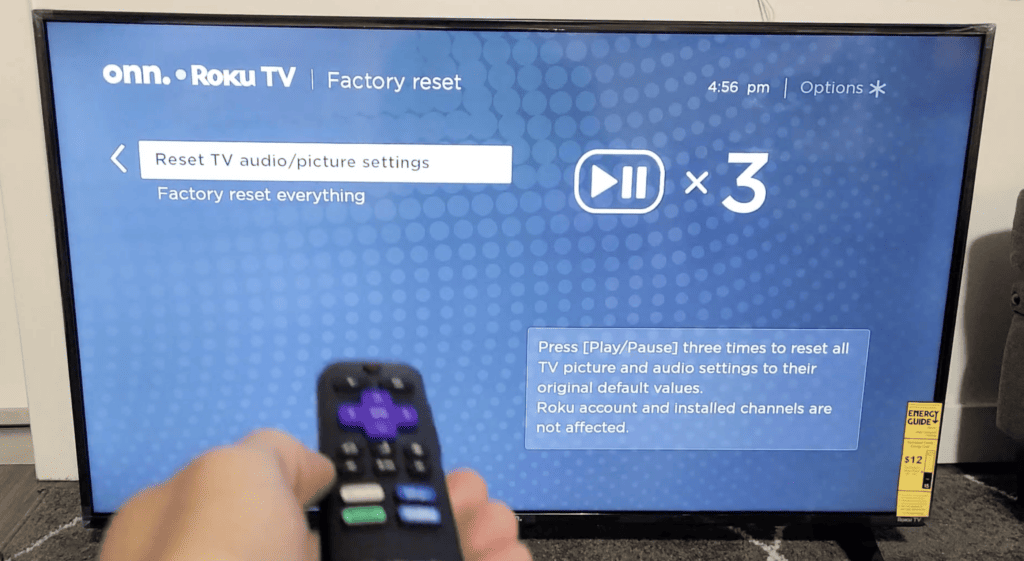
6. Reset the audio/picture setting

Resetting the audio/picture settings might do the trick if all your streaming channels are grappling with audio syncing issues.
This will only reset the audio/picture settings, not the entire device system. In other words, it will revert the audio to its original factory settings.
Just go through these steps:
- Press the Home button on the remote.
- Go to Settings > Systems > Advanced System Settings > Factory Reset > Reset Audio/Picture Setting.
- Press the Play/Pause button on your remote 3 consecutive times.
7. Factory Reset the Roku device
Think of the factory reset as your last-resort solution.
Be sure to try all the solutions listed above before moving on to this final one.
Important: A factory reset will restore the device to its initial out-of-the-box settings.
This means it will remove the current settings, all channels (including their data) and you’ll need to reinstall the apps all over again.
On the bright side, it could potentially resolve any technical issues.
To do this, head to the home screen by pressing the Home button on your remote, then follow this path:
Settings > System > Advanced System Settings > Factory Reset > Factory Reset Everything
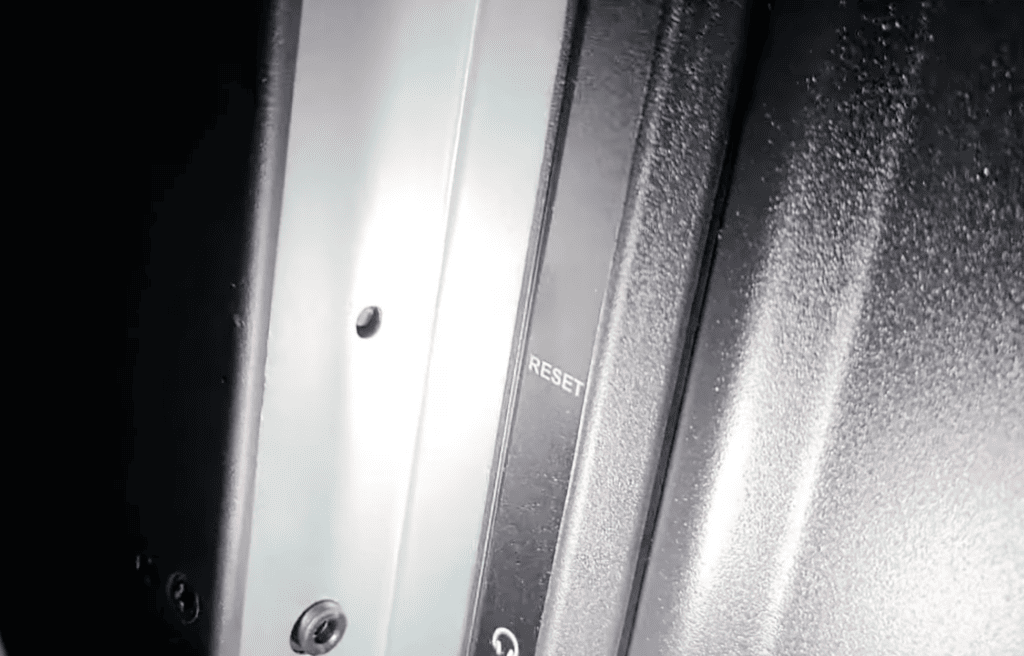
Additionally, each Roku device features a physical Reset button (either a pinhole or tactile button) located on the back or bottom.
You can use the Reset button as an alternative way to factory reset your device, especially handy if your screen suddenly becomes unresponsive.

All you need to do is press and hold that button (using a pen or a straightened paper clip) for about 15 seconds until the Roku logo pops up on your screen.
After performing the factory reset, go ahead and reinstall your channels (refer to solution #5), and see if the audio tunes back in with the video.
What should I do if nothing happens even after following all these solutions?
If your device’s audio problem persists even after trying all these solutions, it might be time to call in the pros by getting in touch with Roku support.
If your device is still under warranty, you could potentially have it replaced.
Wrapping Up
Audio getting out of sync is a pretty common issue with any streaming device, and Roku devices are not immune.
Before diving into the solutions, make sure your internet connection is rated as Excellent or Good.
Once you’ve confirmed a steady internet connection, power cycle the TV as your initial step.
If that didn’t fixed it, grab your Roku remote and try out these potential fixes:
- Change the audio setting to “Stereo.”
- Turn off the volume and audio leveling.
- Restart the Roku device.
- Check for a software update.
- Check other channels.
- Reset the audio/picture setting.
- Factory reset the Roku device.
If none of these measures resolve the issue, it’s time to give Roku support a ring.


