
Nearly all of today’s TVs come with built-in Wi-Fi connectivity.
Hooking up your television to the web opens up the doorway to stream movies or shows on various apps, receive important software updates, and allows you to surf the net right on your big screen.
It’s no longer just a neat add-on; it’s pretty much standard.
As most modern TVs are Wi-Fi capable, we’ve seen a significant rise in issues related to Wi-Fi connectivity. A quick Google or Reddit search will bring up countless people dealing with similar struggles.
In fact, it’s the top tech issue my parents reach out to me for. If I earned a buck every time mom or dad called for help because their TV couldn’t connect to Wi-Fi, I’d be rolling in dough!
While many TV Wi-Fi connectivity troubles can be solved easily, some might need a bit more elbow grease. And that’s why I’ve put this guide together.
In this article, I’ll be diving into the nitty-gritty concerning TVs and Wi-Fi connectivity issues – exploring common causes and providing tried-and-true solutions.
The Clever Fix
Restart the Wi-Fi router by unplugging it for at least a minute, then plugging it back in. Wait for the router’s light to turn green, and then give connecting a shot.
Why is my TV not connecting to Wi-Fi?
More often than not, a wonky router is the primary culprit when a TV fails to connect to Wi-Fi.
But, that’s not always the case.
Other potential causes might include signal interference, router overload, incorrect Wi-Fi frequency, software bugs or glitches in your TV, improperly set DNS settings, inaccurate Date and Time settings, certain TV features, outdated firmware, or even issues with your internet service provider (ISP).

How do I troubleshoot a TV not connecting to Wi-Fi?
Before diving straight into solutions, it’s a good idea to do a bit of detective work first.
Trust me, you don’t want to waste time tinkering with something that isn’t the problem.
If your TV won’t connect to Wi-Fi, it could be because of the router, the TV itself, or your internet service provider (ISP).
Here’s what you should check first:
1. See if your other devices also have trouble connecting to Wi-Fi.
2. Check with friends, family, or neighbors who use the same ISP to see if they’re having Wi-Fi issues too.
If your other gadgets are also struggling with Wi-Fi, it’s likely your router is to blame.
But if everything else connects fine and it’s just the TV, then the TV is the likely suspect.
If other people using the same ISP are also having issues, then there could be an ISP outage in your area.
Once you have a good idea of where the problem lies, you’re ready to start troubleshooting.
And don’t forget the basics, like making sure you’ve entered the correct Wi-Fi password. It might sound obvious, but it’s easy to overlook and can often be the root of the problem!
How do I fix a TV not connecting to Wi-Fi?
If it’s a router issue
1. Restart your router
If your TV is struggling to connect to Wi-Fi and your other devices are also having trouble, the first thing you should try is restarting your router.
Unplug it from the power source and wait for at least a good full minute. Then plug it back in, wait for the router lights to turn green, and try to reconnect your TV to Wi-Fi.
Restarting your router should be your first option if your TV is not connecting to Wi-Fi and you see that other devices in your home are having Wi-Fi problems too.
Routers can sometimes get bogged down with an overload of data, overheat, or accumulate a buildup of residual electrical charges if they haven’t been rebooted in a while.
This results in funky glitches, like devices having problems connecting to it.
Luckily, a quick restart (or a power cycle, as it’s sometimes known) can often solve the issue in a jiffy.
This process drains any leftover electrical charge in your router and refreshes its internal memory, essentially giving it a clean slate. It’s like a full system reboot that wipes out glitches and gets your router back on its feet.
After the restart, your TV should be able to connect to Wi-Fi. But before you attempt to reconnect, make sure all the lights on your router are lit up.
If a simple restart didn’t cut it, don’t sweat it. There are more tried-and-true fixes down the line, and I’ll guide you through them one by one.
2. Move your router closer to your TV
If your router is too far from your TV, that may be why you’re having trouble connecting.
Wi-Fi signals aren’t limitless; they get weaker as you move further from the router.
To be frank, this was one of the earliest Wi-Fi issues my parents faced. They’d stuck their router in a room where the signal was so weak, it just couldn’t reach their devices.
Your home’s thick concrete walls and large metal appliances can absorb and diminish the Wi-Fi signal. Plus, radio waves from certain home appliances like microwaves can introduce interference.
To troubleshoot this, try moving your router closer to your TV. Ideally, they should share the same room. If that’s not feasible, at least aim to place your router somewhere central in your home.
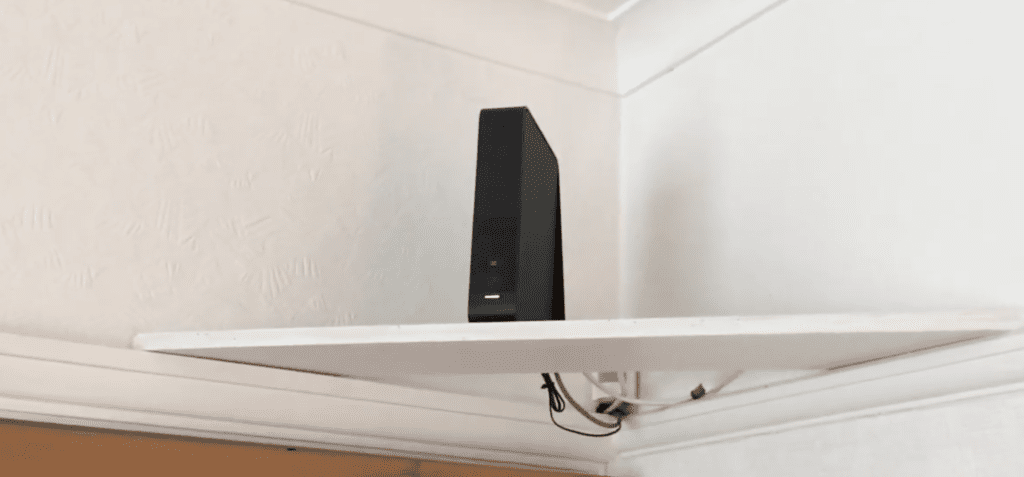
A perfect spot for your router is somewhere high up, around five to seven feet off the ground, to help its signal reach farther.
Also, try to keep your router away from gadgets or appliances that might mess with its signal.
Here’s a bit of real-life evidence: I have a friend who loses their internet connection whenever they use their microwave. Why, you ask? Because their router is right next to the microwave!
If moving your router is a no-go, you might want to consider investing in a Wi-Fi booster or repeater.
3. Remove other connected devices
Typically, home routers can juggle multiple devices on Wi-Fi at the same time. But they can get overwhelmed, leading to connectivity issues.
A quick note here: it’s not the sheer number of devices connected to Wi-Fi that causes overload. The overload occurs when numerous devices are all actively streaming data at once.
Occasionally, a router might “reject” a new device trying to hop on the Wi-Fi, or your TV could get bumped off because too many devices are fighting over bandwidth.
This issue is becoming a tad more common as we add more Wi-Fi-hungry gadgets and appliances to our homes.
We’re not just talking about multiple smartphones, smart TVs, and computers. Modern homes now come with fridges, washing machines, thermostats, and air conditioners all vying for a spot on the Wi-Fi network.
If you suspect an overload is why your TV can’t connect, try unplugging some of your devices to clear up some space on the network.
Then, give your TV another shot at connecting.
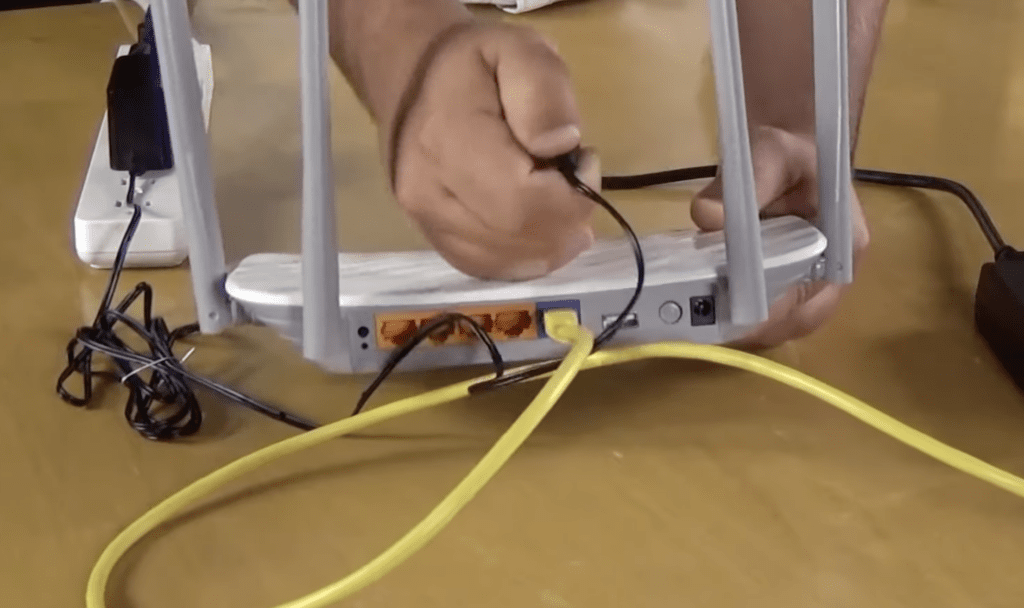
4. Reset your router
If rebooting your router and trying the other solutions above didn’t get you anywhere, your next best bet is a full router reset.
Depending on your router’s make or model, there should be a tiny button around the back. That’s your hard reset button, and pressing it will restore your router to its original factory settings.
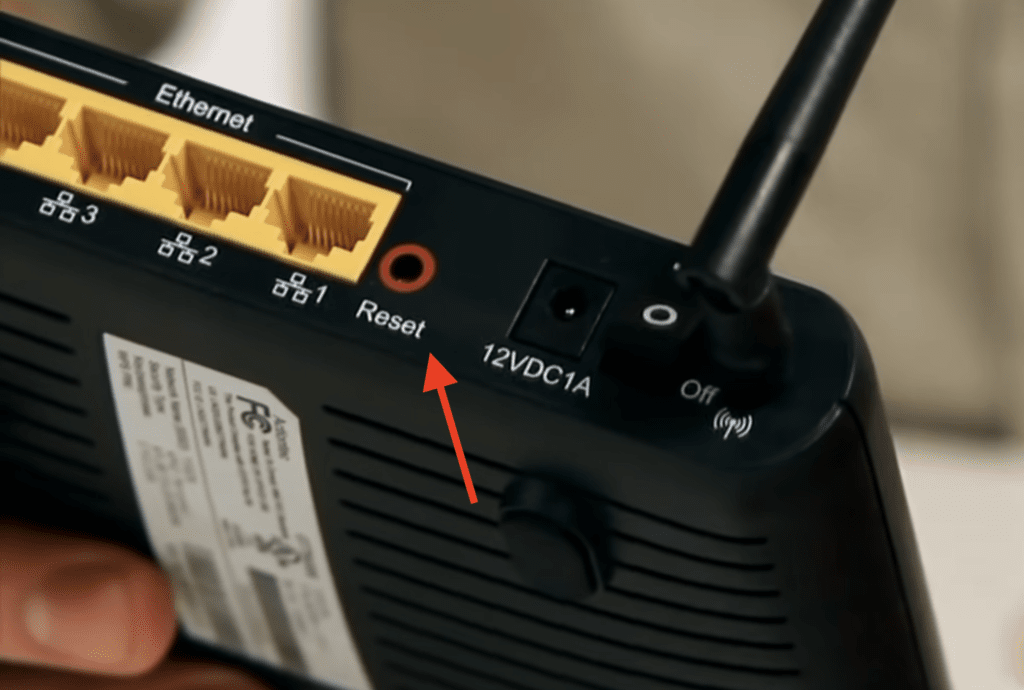
Remember, hitting the hard reset button on your router will erase any modifications you’ve made to its settings. Your router’s username and password will revert back to their original factory defaults.
Quick tip: Check your router’s box or label for the factory default username and password prior to resetting.
To reset your router:
1. Grab a pen or the end of a straightened paper clip and press the tiny rest button on your router.
2. Hold the button down for about 15 to 30 seconds. You’ll know it’s working if the router’s lights start blinking and it kicks into a reboot.
After the reboot, you’ll need to set up your router from scratch, including changing its username and password.
Once you’ve done that, your TV should be able to connect to the Wi-Fi again.
If it’s a TV issue
5. Choose a different Wi-Fi frequency
Many contemporary routers offer dual-band capability.
This means you have two frequency options: 2.4 GHz or 5 GHz.
The 2.4 GHz signal has a better range but slower speed, whereas the 5 GHz signal is speedier but doesn’t reach as far.
Certain TVs, however, aren’t compatible with the 5 GHz frequency.
For instance, some 2018 Samsung TV models don’t support 5 GHz connections, meaning they either don’t see the 5 GHz option or fail to connect successfully.
Insider tip: Check your TV’s wireless standard. It can usually be found in the user manual or on the manufacturer’s website. If your TV’s wireless standard is 802.11ac, 802.11a, or 802.11n, it should be able to handle 5 GHz.
If you’ve been trying to connect your TV to the 5 GHz frequency without luck, I suggest switching over to the 2.4 GHz frequency instead.
Sure, it might be a bit slower, but its wider coverage could be just what you need, especially if your TV isn’t positioned near the router.

6. Power cycle your TV
Sometimes, bugs or glitches are the barriers preventing your TV from joining the Wi-Fi party.
You might wonder, how does a TV even get these bugs in the first place?
You see, when you switch off your TV without unplugging it, the TV isn’t truly off. It’s simply in standby mode to make powering up quicker for you.
The catch is, if your TV hasn’t enjoyed a full reboot in a while, residual electrical charges can accumulate and cause glitches, resulting in issues like your TV not turning on or connecting to Wi-Fi.
Power cycling, also known as a cold boot or soft reset, can often shake these pesky glitches loose.
This process drains the residual electrical charge and resets your TV’s main board, providing a fresh start.
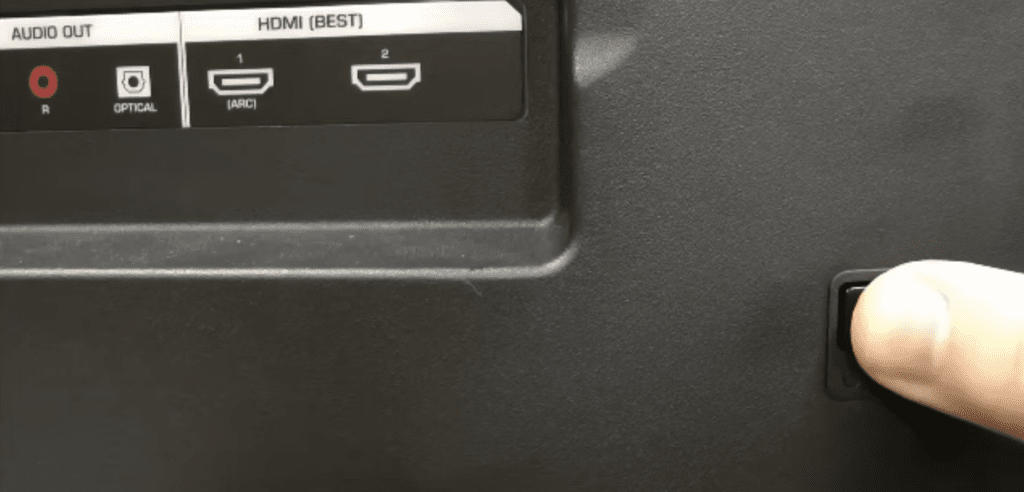
To perform a power cycle, unplug your TV from the power source and let it sit for at least a minute. In the meantime, hold down your TV’s physical power button for about 30 seconds.
After the minute’s up, plug your TV back in and power it up.
Then, try reconnecting to your Wi-Fi.
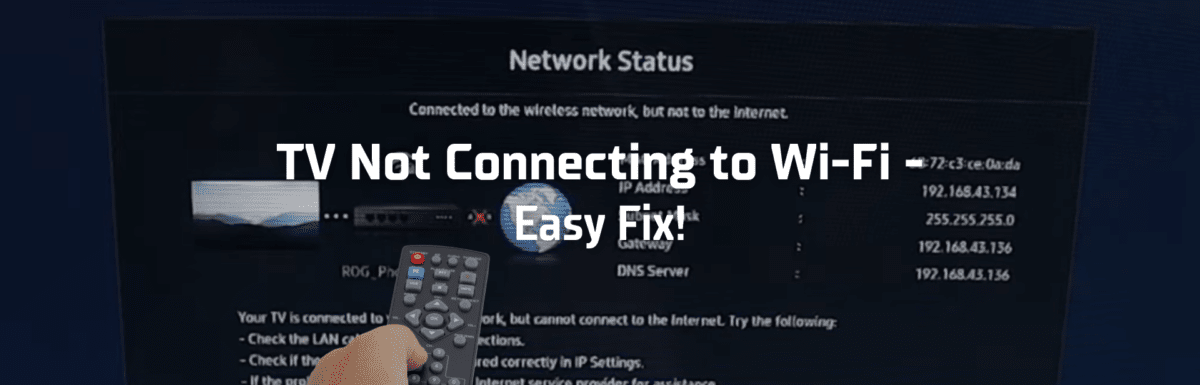
7. Change your TV’s DNS settings
Before we dive into this one, let’s talk DNS.
The Domain Name System, or DNS, is like the internet’s phone book. It’s where domain names and IP addresses live.
Imagine you type “cleverfixes.com” into your web browser.
Your browser will ping the DNS server with a request for this domain. If “cleverfixes.com” is registered in the DNS, the server responds with the domain’s IP address, and voila – you’re browsing the site. This all happens in the blink of an eye.
While most default DNS servers work just fine, not all internet service providers (ISPs) take the time to maintain them.
If you find the default DNS server is unreliable, it might be time to switch to an alternative.
Many TVs allow you to manually change your DNS server.
If you have a Samsung TV, for instance, you can follow these steps to change its DNS:
- Press the Home button on your remote.
- Go to Settings > General > Network > Network Status > IP Settings.
- Go to DNS Settings and select Enter manually.
- Then go to the DNS Server and enter 8.8.8.8 or 8.8.4.4.
- Select OK.

The DNS servers 8.8.8.8 and 8.8.4.4 are public servers maintained by Google, one of the world’s largest tech companies.
Many people trust them because of their reliability and the extra security benefits they offer compared to other DNS options.
Once you’ve made the DNS changes, try connecting your TV to Wi-Fi again to check if it worked.
8. Adjust your TV’s Date and Time Settings
Believe it or not, your TV’s Date and Time settings can influence its ability to connect to Wi-Fi.
If your TV’s time zone doesn’t match up with your router’s or your internet service provider’s (ISP), you might encounter issues due to a lack of time synchronization.
Adjusting your TV’s Date and Time settings to line up with your router or ISP’s timezone can often rectify the issue.
For example, if you have an LG TV, you can check and adjust its Date and Time with these steps:
- Press your remote’s Settings button.
- Navigate to General, then scroll down to Time & Date.
- Put a checkmark on Set Automatically or set the date, time, and time zone manually.
After making these changes, try connecting your TV to your Wi-Fi again.
9. Disable specific HDMI-CEC features
Almost all TV brands include a Consumer Electronics Control (CEC, or HDMI-CEC) feature.
For Samsung, it’s called Anynet+. LG brands it as Simplink, while Sony refers to it as BRAVIA Sync.
This feature helps connected devices communicate with each other. It lets your TV control your external device and vice versa.
For example, if you have a Blu-ray player connected to your TV, you can use your TV remote to control the player. That means you don’t have to use multiple remotes. Pretty convenient, right?
While this is a great feature, some TV manufacturers admit that it can sometimes interfere with Wi-Fi connectivity.
To get your TV back on Wi-Fi, you might need to disable its HDMI-CEC feature.
If you own a Samsung TV, you can disable Anynet+ by:
- Press your remote’s Home button.
- Go to Settings, then General.
- Select External Device Manager.
- Select Anynet+ (HDMI-CEC) and turn it off.
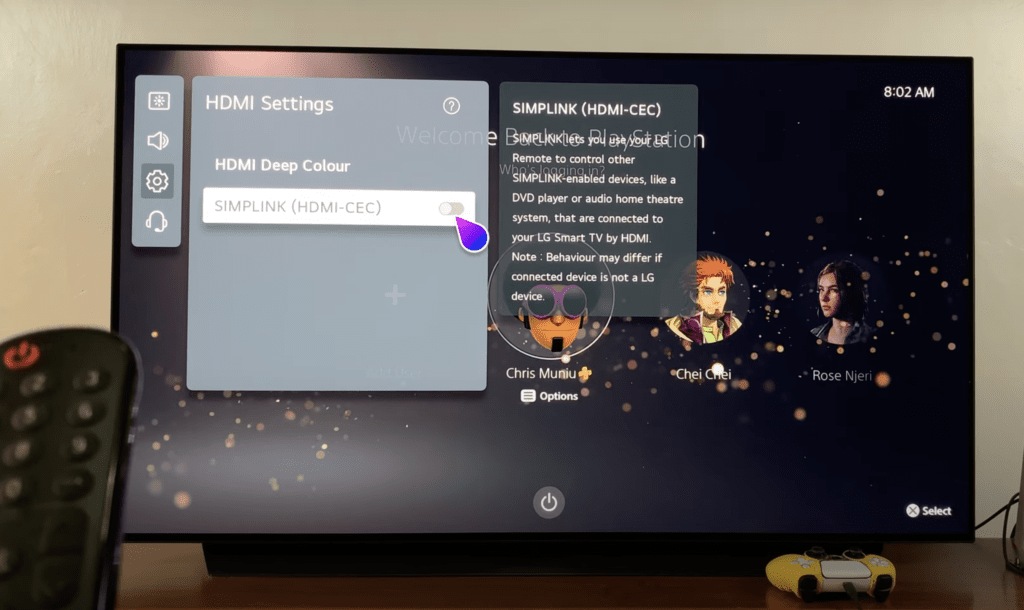
Or if you have an LG TV, turn Simplink off by doing the following:
- Press your remote’s Settings button (gear icon).
- Go to All Settings, then Connection.
- Proceed to Device Connection Settings.
- Switch the Simplink (HDMI-CEC) toggle off.
For Sony TV users, disable BRAVIA Sync using these steps:
- Press your remote’s Settings button (gear icon).
- Go to Settings, then Watching TV.
- Scroll down to External inputs.
- Navigate to BRAVIA Sync settings.
- Toggle the BRAVIA Sync control off.
After disabling your TV’s HDMI-CEC feature, give your TV another power cycle.
Once it’s powered back up, check to see if it can connect to Wi-Fi now.
10. Update your TV’s firmware
If your TV’s firmware is outdated, that might be the reason it can’t connect to Wi-Fi.
TV manufacturers regularly release firmware updates to enhance performance, squash bugs, and add new features.
If your TV’s firmware is out of date, it may still be susceptible to bugs that have already been addressed in these updates.
To solve this issue, you need to keep your TV’s firmware up to date.
Since you can’t connect to Wi-Fi though (unless you have access to another network), you’ll need to download the update on a separate computer and transfer it to your TV using a USB drive.
For Samsung TV owners, you can do this by:
- On your computer’s browser, go to the Samsung Download Center.
- Enter your TV’s model number or click TVs & Home Theater to find your TV model.
- Find and download the correct update under Firmware.
- After downloading, locate the file and unzip it.
- Copy or move the file on a USB flash drive (don’t place it inside a folder).
- Make sure your TV is powered off.
- Plug the USB into the USB port of your TV.
- Turn your TV on and get your remote.
- Press the Home button of the remote.
- Using the remote, navigate your TV to Settings > Support > Software Update > Update now.
- Select Yes.
Follow the rest of the instructions on your TV screen.

The update might take a few minutes, but once it’s completed, your TV should restart automatically.
After the restart, give the Wi-Fi connection another go and see if it’s back in business.
12. Factory reset your TV
If you’ve exhausted all the above options and your TV still can’t connect to Wi-Fi, it’s time to consider a factory reset.
This will revert your TV back to its original, out-of-the-box settings and wipe any changes you’ve made, downloaded apps, and personal data.
That’s why it’s considered a last resort – you don’t want to hit the reset button unless you have to.
For LG TV owners, you can do a factory reset by:
- Press your remote’s Smart button.
- Navigate to Settings, then General.
- Select Reset to Initial Settings.
Your TV will reboot automatically. Don’t unplug your TV while it’s performing a factory reset, or else you risk bricking it.
After the reboot, you can set up your TV again and try to connect to Wi-Fi.
13. Contact your TV customer support teams
If nothing else works, it might be time to call in the cavalry, also known as your TV’s customer support team.
Don’t get me wrong, the fixes I’ve listed usually work the majority of the time. But every now and then, there’s a curveball, like a faulty Wi-Fi module, that requires a professional touch.
The customer support team will probably walk you through some basic troubleshooting steps.
If these don’t solve the problem, they might suggest repair or replacement.
If your TV is still under warranty (usually a one-year limited warranty from the date of purchase), the manufacturer might cover this.
Alternatively, you can take your TV to a local repair center. It may cost you some money, but at least you’ll be assured your TV will be handled by a professional.
If it’s an ISP issue
14. Contact your ISP
If all your devices (and even those in neighboring homes with the same ISP) are having Wi-Fi problems, your area might be experiencing an internet or ISP outage.
While these are pretty rare nowadays, they do still crop up from time to time. Luckily, ISPs are generally quick to sort them out.
Get in touch with your ISP to confirm the problem and get an estimated restoration time.
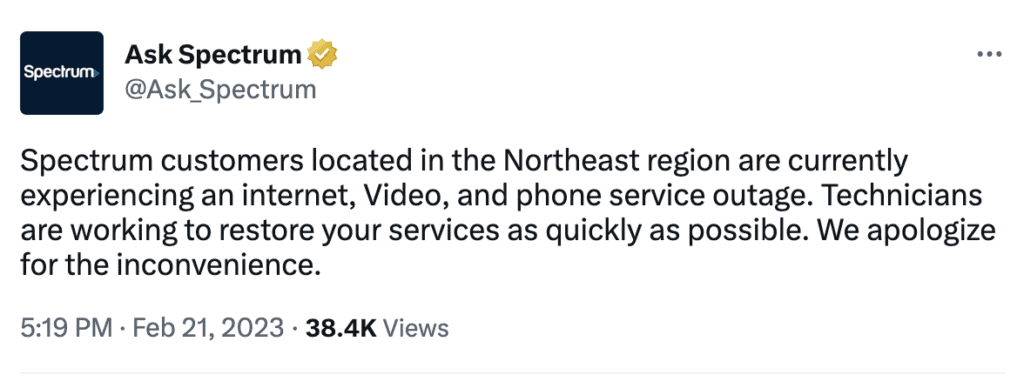
You might also want to peek at your ISP’s social media accounts – they often post useful updates and announcements there.
Conclusion
As smart TV usage continues to rise year over year, we’re seeing more instances of TVs struggling to connect to Wi-Fi.
These connection issues can usually be chalked up to the router, the TV itself, or the ISP. The good news is, these problems are often minor and easily fixed.
For starters, if your TV isn’t connecting to Wi-Fi, try restarting your router.
You should also try other proven fixes below if restarting your router didn’t do the trick.
If it’s a router issue:
- Move your router closer to your TV.
- Remove other connected devices on your network.
- Hard reset your router.
If it’s a TV issue:
- Choose a different Wi-Fi frequency.
- Power cycle your TV.
- Change your TV’s DNS server.
- Adjust your TV’s Date and Time Settings.
- Disable your TV’s HDMI-CEC feature.
- Update your TV’s firmware manually.
- Factory reset your TV.
- Contact your TV customer care teams.
If it’s an ISP issue:
- Reach out to your ISP.
Hopefully, you won’t have to try every single one of these steps to reconnect your TV to Wi-Fi.