

“Blink helps you protect what matters most no matter where you are.” – Blink
Just picture this – you snap up a top-notch security device to protect what matters most, only to find out that it, out of the blue, stops recording.
You need a solution ASAP, so you can feel confident leaving the house without worrying about what might happen while you’re gone. Otherwise, you’re left with nagging doubts about someone breaking in and, worst of all, not having the recorded evidence when you need it the most.
If your Blink camera isn’t recording, don’t jump to thinking it’s faulty. There’s no need to start rummaging around for that warranty or shopping for a replacement camera just yet. It might just be a simple issue you can fix yourself!
The Clever Fix
If your Blink camera is not recording, double-check in the Blink app if the Energy-saving feature is turned off and the Motion Detection is turned on.
Both the motion detection and energy-saving features can put a stop to your camera tracking movement, which in turn means no recording.
It’s possible that you might have unknowingly tweaked these settings while navigating the Blink app, so it’s a solid place to start.
How to check if the energy-saving feature is off
Launch the Blink app and go to: Settings > Power > Energy/Battery-saving. The energy-saving feature is turned off if the toggle switch is gray.
How to check if the motion detection is on
Launch the Blink app and check if the Armed button on the homepage is turned on.
If you’ve confirmed these are both set correctly but the camera still isn’t recording, then keep scrolling!
We’ll explore other potential culprits to troubleshoot this issue.
Why is my Blink camera not recording?
Don’t worry, this happens across all surveillance camera brands. The hitch usually boils down to either an internet connection hiccup, an overlooked subscription payment, a full storage capacity, or tweaked camera settings.
But hey, there’s a simple way to pinpoint what’s going wrong with your Blink camera: check the light indicator.
Here’s a handy guide to understanding those light signals:
- Flashing red light = low battery, busy setting up, or it senses movement
- Steady red light = not connected to the network or currently finishing installation
- Flashing green light = internet connection is not strong
- Steady green light = not connected to the network and currently not recording
- Flashing blue light = completing installation
- Steady blue light = connected to the network and recording
Now that you know what each light means, you can match the issue with the appropriate fix.
Just a heads up: if you see a steady blue light but the recording still isn’t working, it may take a bit of trial and error to find the solution.
Don’t worry, though – I’ve made sure that the solutions outlined here are both speedy and easy-to-follow.
How to fix my Blink camera not recording
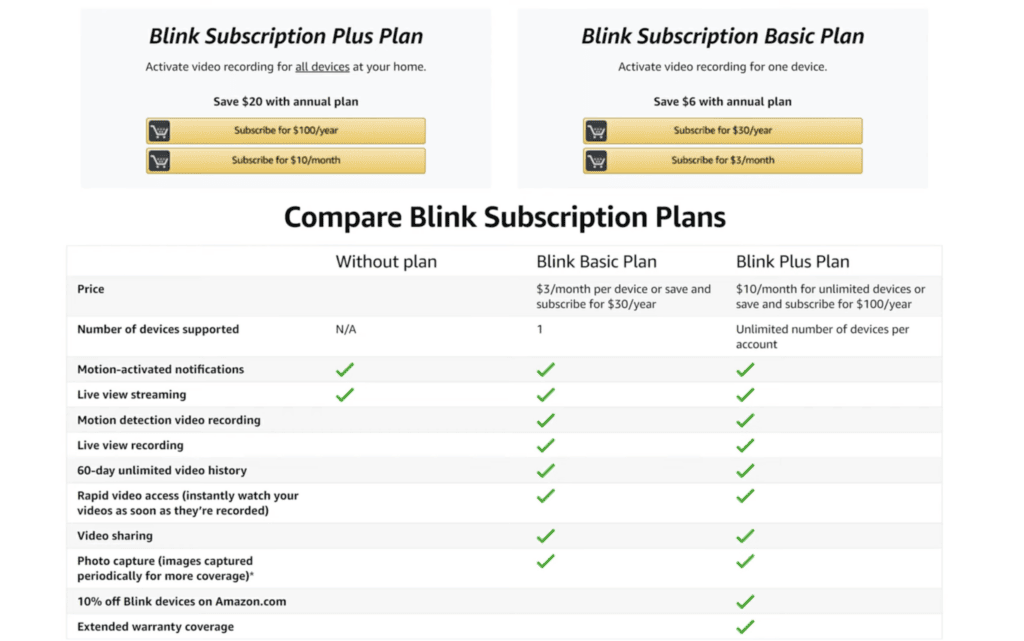
1. Check the subscription status
First things first: make sure your subscription is up to date before you start tinkering with the device itself.
One of the top culprits behind a non-recording Blink camera is an unpaid subscription.
Once your subscription is canceled, you lose access to recording and unlimited storage. You’ll be left with only the live-stream feature.
So, be sure your subscription is renewed, or if you’re using a free trial, that it hasn’t yet expired. Look out for email reminders about due payments or nearing the end of your free trial period.
Didn’t subscribe
If that’s the case, you can skip checking the subscription status and move onto the other solutions below.
Still in the free trial mode
If you’re still within your 30-day free trial, your camera should be recording flawlessly. If it’s not, there must be other reasons behind it.
Take a look at the solutions provided below and consider subscribing or setting up local storage support once your free trial is over.
The free trial has just ended, and you have a local storage backup but still not recording
When the free trial wraps up or your subscription gets canceled, and you’ve got local storage ready to go, your recording should be operating just fine, shifting to local storage automatically.
But sometimes, it doesn’t play out that way. If that’s your situation, try solution #6: Reset the sync module.
Ensure you don’t plug in your local storage into the sync module until the app poses the question about your storage preference (cloud or local storage).
In some cases, it take a couple of days for the app to ask you this. Once you hook up your local storage, the recording should be back in business.
Your subscription was paid, but the recording is not working
Your recordings should be up and running smoothly again once you’ve renewed your subscription. If that’s not the case, explore the other solutions that follow.
2. Check internet connectivity
Like all internet-dependent gizmos, your Blink camera might hit a snag if the connection is wobbly. A flashing green, steady green, or steady red light can signal an unsteady internet connection.
Alternatively, you can check the internet connection strength in the Blink app by following this sequence: Settings > General Settings > Network
Under the Network section, you’ll see the Wi-Fi connection strength of your camera to Wi-Fi and the sync module’s strength to the network.
If you find the internet connection strength isn’t quite cutting it, here are some snappy fixes:
- Reset the Wi-Fi router. Turn off your modem, unplug your Wi-Fi router for 60 seconds, plug it back in, and wait for the sync module to connect.
- Press the reset button on the camera. If one camera has a steady red light indicator, refresh it by pressing the reset button located on its back for a few seconds.
- Move the sync module closer to the router. After you move your sync module closer, use the Pull to Refresh button in the Blink app to refresh.
- Move the sync module closer to the Blink camera or vice versa. The camera needs to stay within the sync module’s range because it depends on it for network access.
If the Blink camera is reconnecting, it will go from steady red light to a flashing green light to blue light. If the light doesn’t turn blue, try other solutions.
3. Check battery life
A dwindling battery could be the reason your Blink camera has stopped recording.
Apart from the flashing red light signaling a low battery, you can also use your Blink app to check the battery level.
To do this, launch the app, go to Camera Settings, and check if the battery strength is OK or Need Replacement.
If it says OK, the Blink camera’s batteries aren’t the problem. If it flags Needs Replacement or shows the battery level below 25%, get those batteries replaced right away.
Once you’ve popped in fresh batteries, your recording function should be back in action. If not, it looks like we’re dealing with more than just a battery issue. Let’s dig deeper!
Can I use rechargeable batteries?
No can do, I’m afraid. Blink cameras and rechargeable batteries don’t play well together, which could lead to technical glitches.
4. Check local storage capacity
If you’re not subscribed to a plan, this tip is for you. Your Blink camera will halt recording when your flash drive has less than 375 MB storage space left.
The drawback of sticking to local storage rather than a subscription is the need to keep an eye on how full it is and manage the saved clips.
To check local storage capacity, open the Blink app, and go to Sync Module > Sync Module 2 Settings > Local Storage.
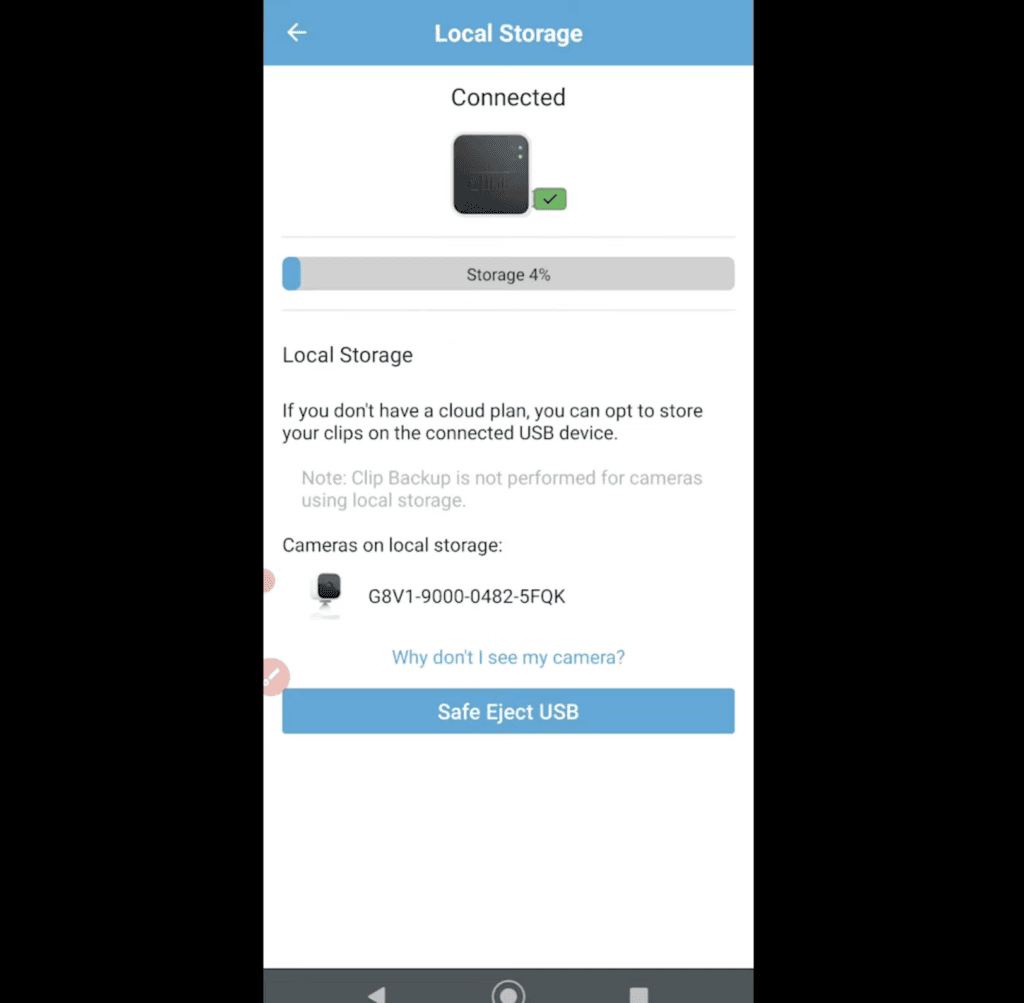
If you see it marked as full, you can free up some space by manually deleting old clips or opting for a Blink subscription.
Before you start deleting old clips, always safely eject the flash drive before disconnecting it from the sync module. To do this, launch the Blink app and follow this sequence: Sync Module > Local Storage > Safe Eject USB.
Once you’ve done that, connect the flash drive to a laptop, clear out some files, then plug it back into the sync module.
With some extra room in your local storage, your camera should be back to recording in no time. If clearing your storage didn’t do the trick, fear not, let’s explore other solutions.
5. Adjust motion sensitivity
One reason your Blink camera might not be recording could be that it’s not detecting any activity in its field of view.
Keep in mind, your Blink camera is motion-activated, it only springs into action when it senses movement.
If the Motion Sensitivity setting is too low, your camera might struggle to pick up movement, thus, no recording.
Crank it up too high, and you could end up with a deluge of pointless clips from random movement, like wind-blown branches.
Here’s how to adjust the motion sensitivity in your Blink app:
- Click on Camera Settings > Motion Detection > Sensitivity.
- Adjust the Sensitivity up to 6 or 7.
Give it a go and see if adjusting the motion sensitivity does the trick.
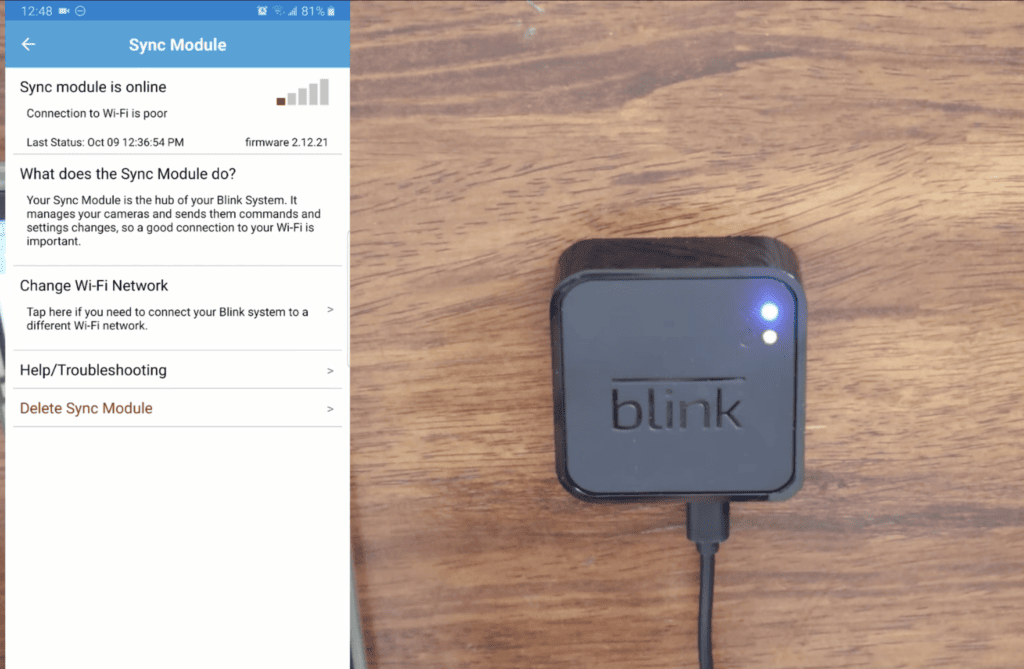
6. Reset sync module
Before diving into a full reset, it’s worth trying the unplug-replug method to give the device a refresh.
Simply unplug the sync module for about 10 seconds, then plug it back in.
If that doesn’t work, it’s time to perform a reset using the physical button on the sync module.
Don’t sweat it, you won’t lose any of your camera settings connected to the sync app. You won’t have to go through the rigmarole of setting up all your cameras (settings, names, etc.) before linking them back to the sync module. It will only reset the sync module itself.
If you’re all set to reset your sync module, here’s what you need to do:
- Click on Disarmed on the Blink app homepage.
- Safely eject the flash drive (see steps in solution #4).
- Remove the sync module from the app.
- Hold the reset button on the module until the light indicator is flashing red.
- Wait for a few seconds until the light indicator becomes a flashing blue light, then steady green.
- Re-add the sync module in your app (will require you to scan the QR code and input network information).
- Choose the camera system to link in the sync module.
- Plug the flash drive in the sync module.
- Click on Armed on the Blink app homepage to arm the system again.
Just like any other gadget, a reset can work wonders for fixing technical issues. It’s like hitting the refresh button, so ideally, this will have sorted out your recording snag.
Still no luck? We’re down to our last resort: a factory reset.
7. Factory reset sync module
When all else fails, a hard reset is your final fallback to tackle the recording issue.
Bear in mind that you can’t perform a factory reset solo. You’ll need to reach out to x Blink customer support for assistance.
Blink customer support has the tools to reset your camera as long as you can provide proof of purchase, the serial number, and other pertinent details.
Wrapping up
A camera that suddenly halts its recording is a run-of-the-mill glitch with surveillance cameras, but the fixes are straightforward and quick.
The Blink camera’s light indicator also serves as a handy diagnostic tool to identify potential issues that may have caused it to stop recording.
Before you dive into fixes, start by confirming in the Blink app if the energy-saving feature is deactivated, and the motion detection is activated.
If these are set correctly but the recording is still on the fritz, the steps to resolve it include:
- Check your subscription status.
- Check internet connectivity.
- Check battery life.
- Check local storage capacity.
- Adjust motion sensitivity.
- Reset the sync module.
- Factory reset sync module.
Fingers crossed, your Blink camera is back to recording as it should be!